Model AJ 350 Set-Up 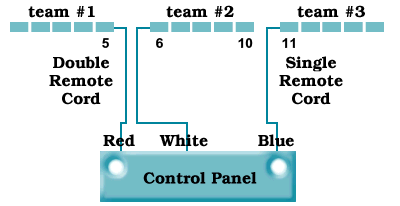
Model AJ 450 Set-Up 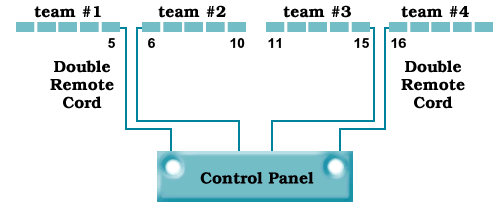
Strings of Seat Pads and Sets of Handheld Switches are all interchangeable and can be used for any team at any location on the chairs. Place Seat Pads about 2 Inches from the front of the chairs. It is not necessary to tape the pads to the chairs, since they are designed to "cling" to the chair when the quizzer jumps. Remote Cords - USE CARE WHEN ALIGNING AND JOINING PLUGS! Run the Remote Cord from the plug ends between chairs to the quiz box on the scorekeeper's table. The ends of the remote cords are color-coded to enable you to make the appropriate connection between the seats and the control panel. The colored plugs are all interchangeable, meaning that any team may use any set of plugs provided the same color is used on both ends. Under some circumstances, you may wish to plug the Seat Pads or Handheld Switches directly into the control panel, bypassing the remote cord. This is sometimes useful in an informal practice session. Checking the System - Remember that Seat Strings or Handheld Switches must be plugged into the control panel for lights to turn on. At the beginning of each quiz session, check the lights as follows:
NOTE: On Handheld Switches, press and hold the red button to activate each light. As in Seat Pads, red dots above each socket on the Control Panel and Set Up Instructions diagrams indicate which way the Seats or Handhelds should turn. Team #1 on all models (and also Team #3 on Model 450) turn toward the left. Therefore the last Seat from the plug and #5 Handheld become the #1 quizzer, thus as 5-4-3-2-1, they then become 1-5. IMPORTANT NOTICE: Inter-Connect Cord - Any two quiz boxes can be joined for more quizzers to compete at one time. Simply insert this cord into receptacles marked "Inter-Connect" on both Quiz Time units. The one which receives the plug with the 1/4 inch limiting sleeve will now provide the control power for both units…therefore its Master switch must be on for quizzing. The other plug, you will note, does not have a limiting sleeve and will thus go into the panel one additional notch, canceling out the power source of that unit. This means the master switch on this unit can be on or off ... it doesn't matter. The individual light switches on both units are operative ... you can select whichever lights are needed at any time. Powerpack - Each quiz box is supplied with a REPLENISHABLE QUIZ-TIME POWERPACK under the control panel. This pack has been developed as an alternative to the #479 Eveready battery which had been used in early Quiz Time equipment. It is made up of ten 9-Volt Heavy Duty battery cells. (Follow instructions on the Powerpack carton when adding or replacing single cells, as needed, without having to purchase a complete 90-Volt battery each time. THE CARTON MUST BE REUSED and the flaps taped to hold the batteries together and serve as a moisture barrier.) Powerpacks can be ordered on the Replacement Parts page ... Or ... TO REPLENISH THE POWERPACK, please do the following:
Service - This equipment is carefully designed for many years of trouble free service. It is durable and completely safe. The Powerpack should last three or more years under normal usage. One indication that the battery needs replacing is when a light fails. When this occurs, check the battery first. The working voltage should be between 75 and 90 volts. (You may wish to unsnap all the cells from each other and check their voltages individually ... then replace the bad ones.) Advise your quiz leaders to conserve power by turning off the Master switch during time-outs, between quizzes, etc. Always pull the plugs before storing the unit as a precaution against power drain. With the plugs pulled, the switches on the unit become inoperative ... whether on or off. A Word about Replacing Lights ... The lights mounted in the control panel have been carefully selected and "balanced" to work in unison ... and they should last for the life of the unit. If a light fails (with everything plugged in and switches on) try these suggestions:
If none of these suggestions work ... consider changing the old light. Incidentally, the amber shell should NOT BE REMOVED. Just clip the wires where soldered and pull the old light out by the wire leads. (NOTE: A spare light and switch with instructions are in a small packet under the light panel of every quiz box.) Notice that on the spare light, one of the leads is sharply bent over. When installing, THREAD THIS BENT LEAD THROUGH THE SMALL HOLE in the amber shell and connect it to the long wire. The straight lead receives the black sleeve and is attached to the slide switch. NOTE: Lights in Amber Shells + Instructions can be ordered on the Replacement Parts page. Follow the correct sequence to successfully remove broken shells and install the new ones without damaging the panel.
Quiz Equipment FREE Quiz Kit Ministries Contact Us Home title="Quiz Time Systems :: Electronic equipment for groups or teams to interact in a Quiz Show format." class="button button1">Home
| |||||||||||||||||||||||||||||
